Objectives
By the end of the lesson pack you should:
- Understand what the CAGED system is and how it works.
- Understand how to apply the CAGED system to chords.
- Understand how to apply the CAGED system to scales.
- Understand how to apply the CAGED system to arpeggios.
Prerequisites
It would help to know:
- The notes on the lowest three strings of the guitar.
- How to play a C, A, G, E, D, Am, Em, and Dm chord in the open position.
- How to play a barre chord.
- How to play the minor pentatonic scale in one position.
The CAGED System
The CAGED system is a way of mapping chords, scales, and really any sound you can think of on to the fretboard. It is product of the way the guitar is tuned and is a beautiful coincidence of the instruments design.
You should think of the CAGED system as a map. Typically a map describes the layout of an environment. For example a map of your city describes the layout of your city. The CAGED system is a map that describes the layout of sounds on the guitars fretboard.
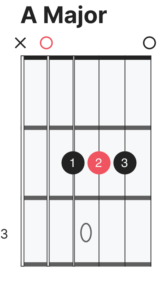
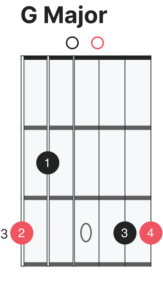
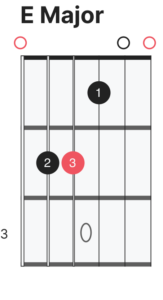
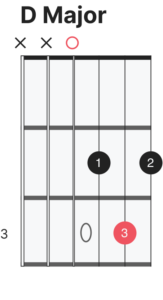
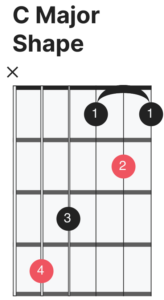
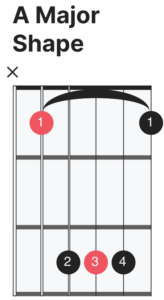
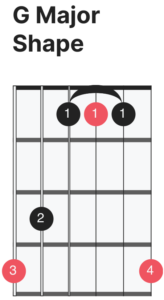
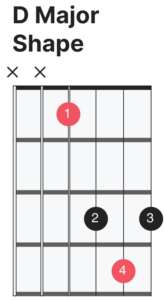
The guitar is a shape based instrument. The open chords you have learned so far are all shapes. There are five open major chords, giving you the the C shape, A shape, G shape, E shape and D shape.
Knowing five chords is great but would be even better If you could play a chord anywhere on the guitars neck. For example to be able to play a C chord at the 8th fret. The CAGED system can help you figure out how to do just that.
If you can already play a barre chord you should understand that you can take these open chord shapes and move them up the fretboard. For example you can take an A shape, put a barre in front of it to act as the nut of the guitar (it replaces any open strings), and then move that shape around.
The CAGED system is based off this principle. That you can take any open chord shape and move it around the fretboard using a barre in place of the open strings.
See the below for all the open chords and there barre chord counterparts.

How To Map The CAGED System
The fact the system is called CAGED is not just for a catchy name. In fact it’s the order the shapes lay themselves out on the fretboard. If you play a C chord using a C shape, the next C chord shape up the fretboard is an A shape. After the A shape the next C chord shape is the G shape. The next C chord shape is the E shape which is then followed by the D shape.
After you get to the D shape you go right back to the start again. The next C chord shape is the C shape with the C shape. This forms a cycle that runs in up the fretboard in the order C, A, G, E, D, C, A, G, E, D. Spelling CAGED.
It doesn’t matter where you start. If you start with a G chord using the G shape. The next chord shape will be an E shape, followed by a D shape, then a C shape, then an A shape, before returning to the G shape.
Landmarks
To navigate the CAGED system you need to use landmarks. Similar to navigation in the outdoors, landmarks help you figure out where you are, and where to go, by acting as a reference point. The landmarks we’re going to use are the notes on the fretboard. This means you really need to have all the notes on the lowest three strings memorised. Although not a very exciting task, it really will unlock the fretboard for you.
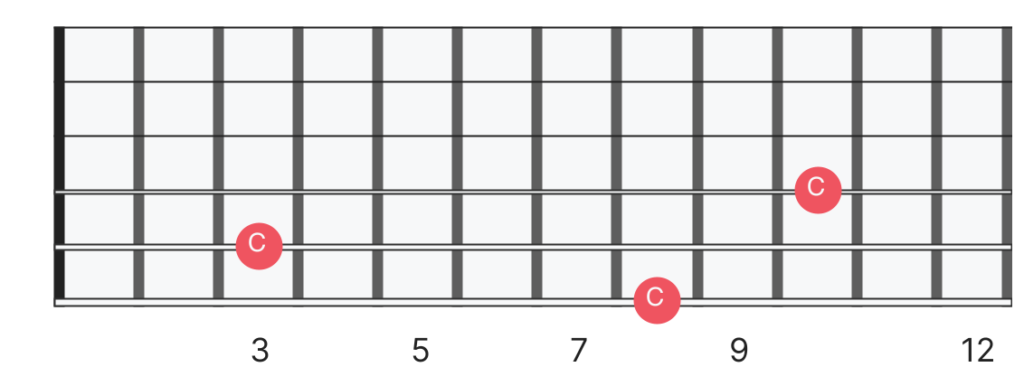
This works well because between the nut and the 12th fret each note only appears once on each string. For example there is only one C on the E string, one C on the A string, and one C on the D string. Each one of these Cs is a landmark from which you can play a C chord.
To figure out where to place each shape you then need to match the lowest root note in the shape to the land mark on the fretboard.
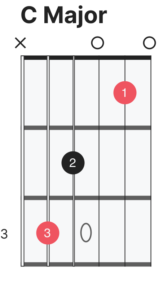
Each open chord shape has a root note that it derives it’s name from. For example in an open C chord the root note of the chord sits under your third finger, on the A string at fret three. This is root note for the C shape, it is a C note. If you move it around it won’t be a C note any more, but the root will stay in the same place.
Mapping Major Chords
Start developing your fretboard map by using the CAGED system to map out the major barre chord shapes. We’ll do it with C chord first. Once you understand the process you can do the exercise at the end of this section. Which will have you practice using C chords again, before repeating the exercise with other notes.
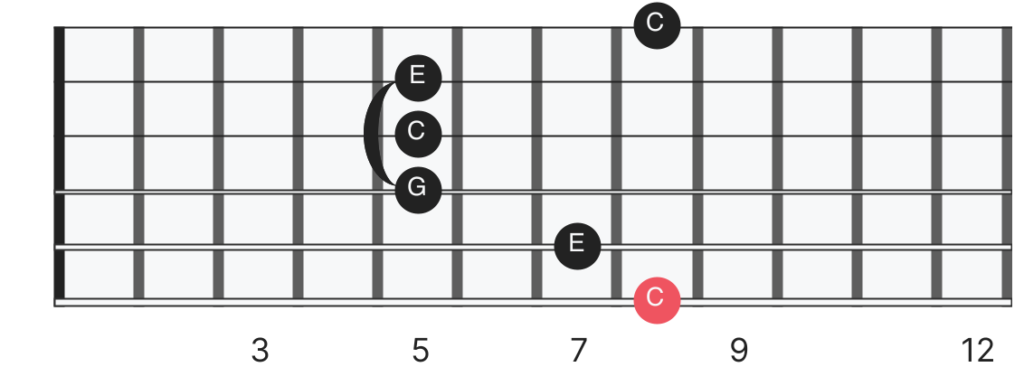
The first step is to locate the nearest landmark (in this case a C note) to the headstock. Do this by moving up the fretboard towards the body until we find a C on either the low E, A or D string. The first C we encounter is at the third fret of the A string. This our first landmark.
From this landmark you can build a C chord moving towards the headstock, this is ends up being the C shape.
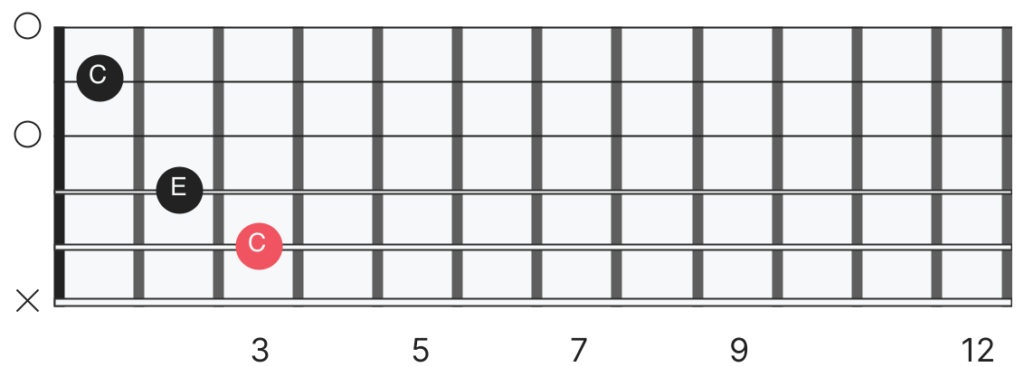
Or you can build a C chord moving towards the body, this ends up being is the A shape.

Any chord built from the landmark on the A string is a C shape in the direction of the headstock, and an A shape in the direction of the body.
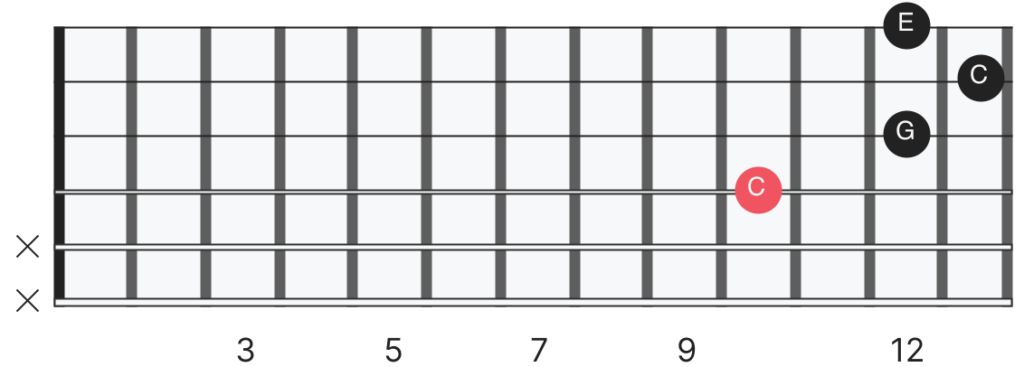
Moving further up the fretboard to find you next landmark, the next C is at fret 8 on the low E string. From this landmark you can build a C chord towards the headstock, this ends up being the G shape because it’s the next letter in the word CAGED.
Or you can build a chord moving towards the body, this is ends up being the E shape.
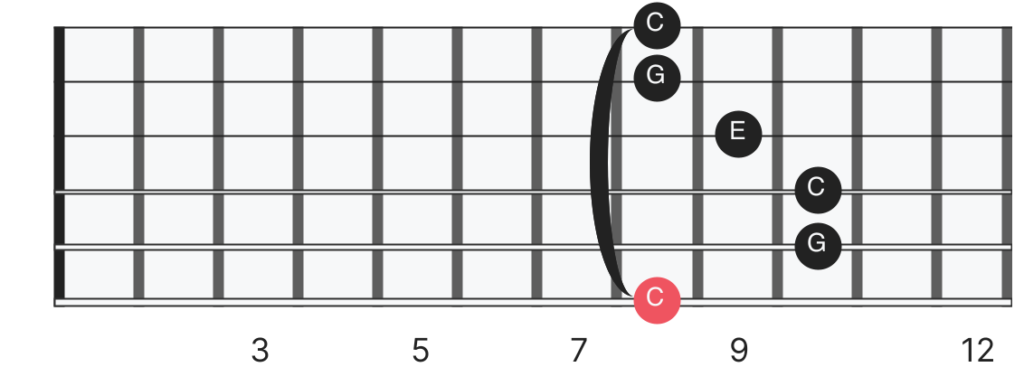
Any chord built from a landmark on the E string is a G shape in the direction of the headstock, and an E shape in the direction of the body.
This leaves you with only the landmark on the D string. This is at fret 10. You can then build your C chord using an E shape in the direction of the headstock.
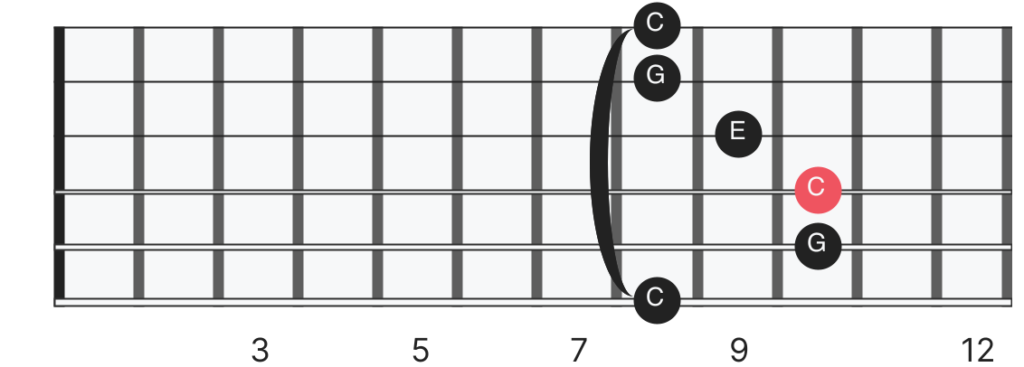
Note that in this case it’s still an E shape but the landmark is on the D string. Normally I would use the low E string landmark for the E shape. However it’s worth knowing the D string landmark exists for this shape as you might use it for smaller chord shapes like triads.
Finally you can build a C chord using a D shape in the direction of the body.
Any chord built from a landmark on the D string is an E shape in the direction of the headstock, and a D shape in the direction of the body.
Hopefully you can see that every landmark has a shape that can be built towards the headstock, and a shape that be built towards the body. The order of these shapes is always C A G E D.
This means that the C and A shapes are always neighbours on A string. G and E are always neighbours on the E string. And the E and D shapes are always neighbours on the D string.
This works for every open chord. You could do it with a G chord. The first G note to act as a landmark is at fret three on the low E string. From this land mark you can build a G shape towards the headstock, or an E shape towards the body.
The next G landmark is on the D string at fret five. From here you can build an E shape towards the headstock or a D shape towards the body.
Your final G landmark is at fret ten on the A string. From here you can build a C shape towards the headstock, or A shape towards the body. The pattern the shapes appear in is always the same. All that changes is the landmark.
Now you understand this you should try the exercise for this portion of the lesson.
Exercise – Mapping Major Chords
Mapping Other Chords
You can now play major chords from any note on the fretboard. In theory you can also do this with minor chords. There are five open minor chord shapes (Cm, Am, Gm, Em, Dm), two of them are hard to play but the principle still applies.
Find the landmark on the A string, you get a C minor shape towards the headstock, and an A minor shape towards the body. Find the landmark on the low E string and you’ll get a G minor shape towards the headstock and and a E minor shape towards the body. Find the landmark on the D string and you’ll get an E minor shape towards the headstock, and a D minor shape towards the body.
There’s five shapes, and as long as you know where the root note of the shape is, and where the note on the fretboard is, you can play any chord, anywhere. This principle will work for any chord quality, think of the landmark, then the direction will tell you the shape you need.
As another example lets say you wanted to play E7 somewhere new. There’s an E on the A string at fret seven. Say you want to move towards the headstock, This means you should use a C shape. You then just need to modify that shape to become a dominant 7th chord. So you should use a C7 shape. Now you have E7 at the 7th fret using a C shape.
Exercise – Mapping Other Chords
The Minor Pentatonic Scale
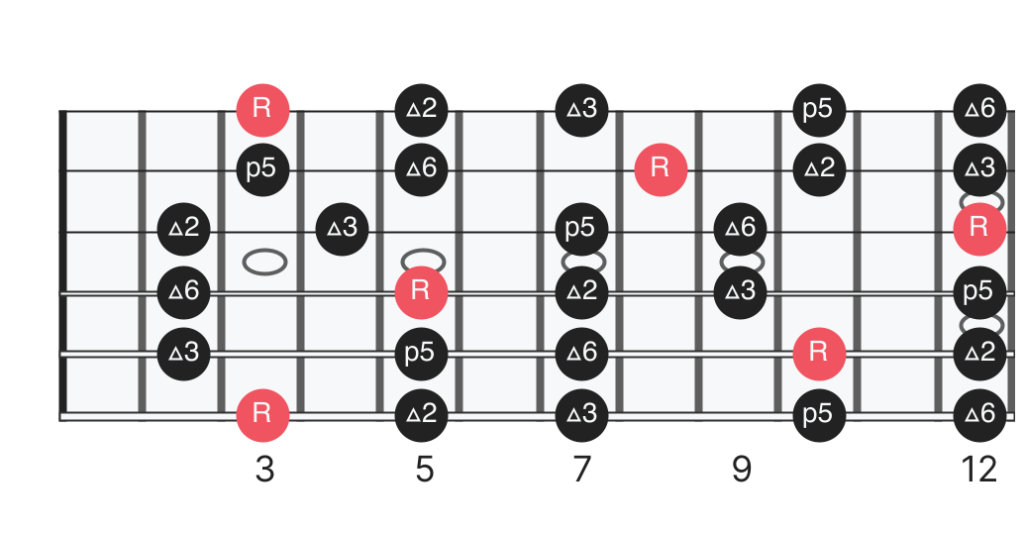
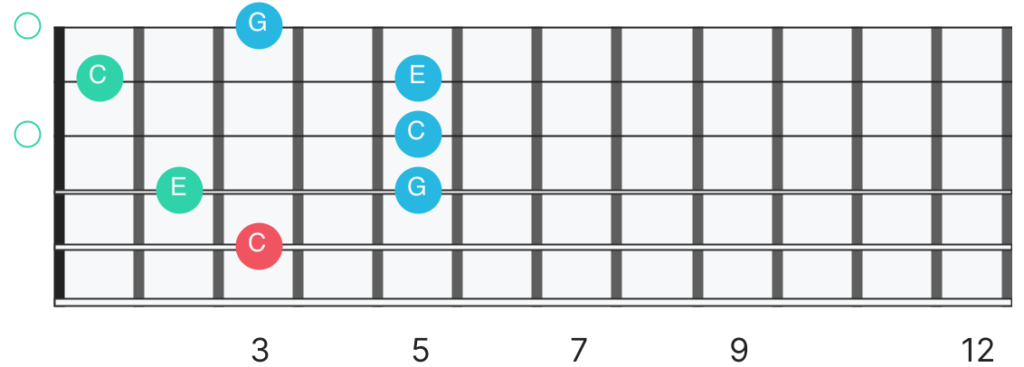
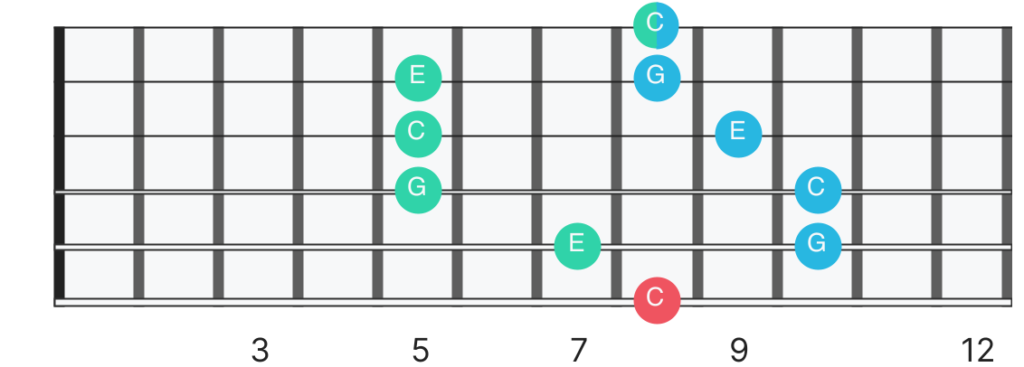
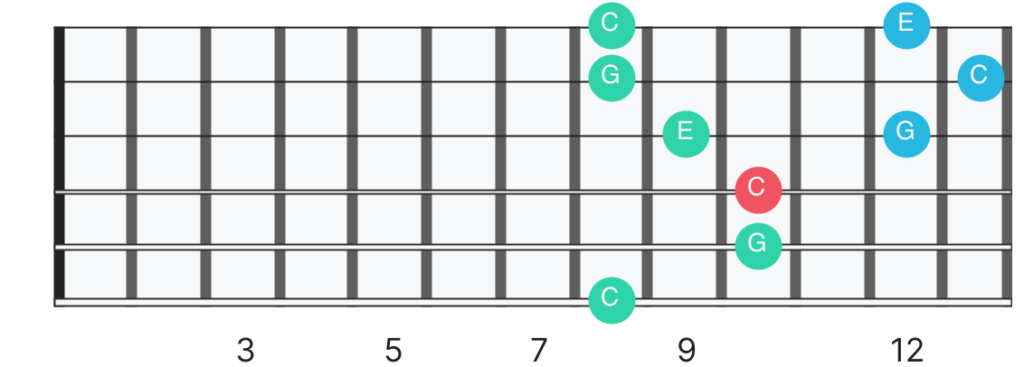
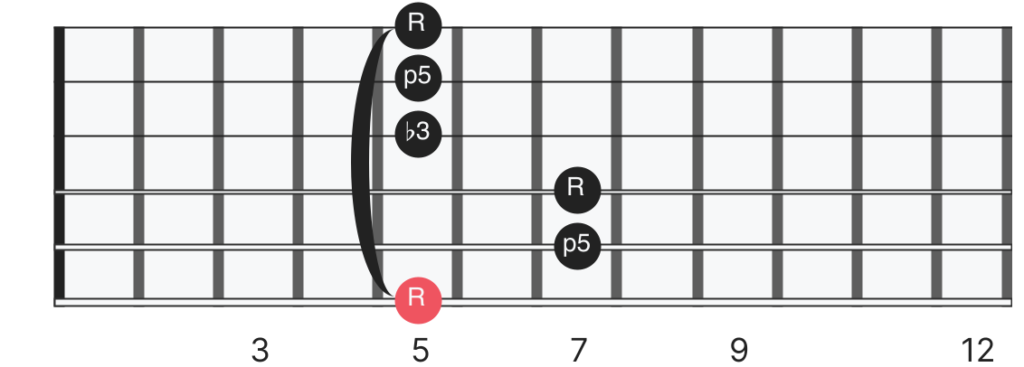
Now that you understand how the CAGED system maps out chords. Let’s look at how it maps out the pentatonic scales. Jump up to the 5th fret on the low E string, you can build an Am chord, using an Em shape towards the body.
From this same landmark note you can build a minor pentatonic scale moving in the same direction.
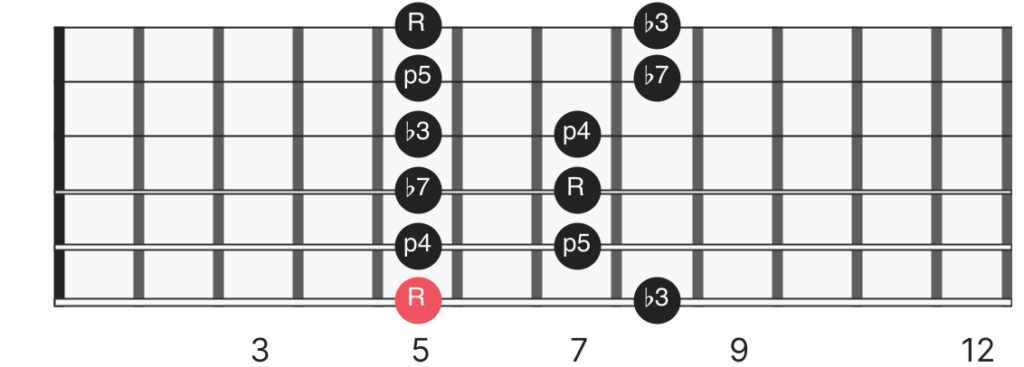
If you overlap the notes in the minor pentatonic scale with the notes in the chord you should see that the minor pentatonic scale contains all the notes from the chord.
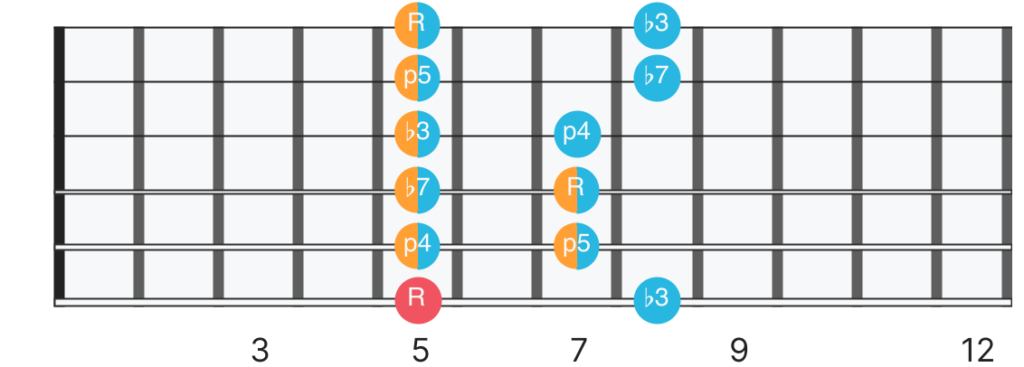
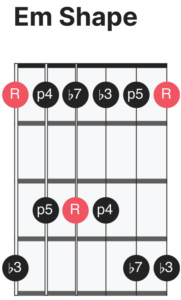
This minor pentatonic shape overlaps an Em chord shape. Therefore you can call it the Em shape of the minor pentatonic scale.
This is true for all five of the CAGED shapes. Every CAGED scale shape has a one of the five open position chord shapes contained within it. You can then name the scale shape based on the underlying chord shape.
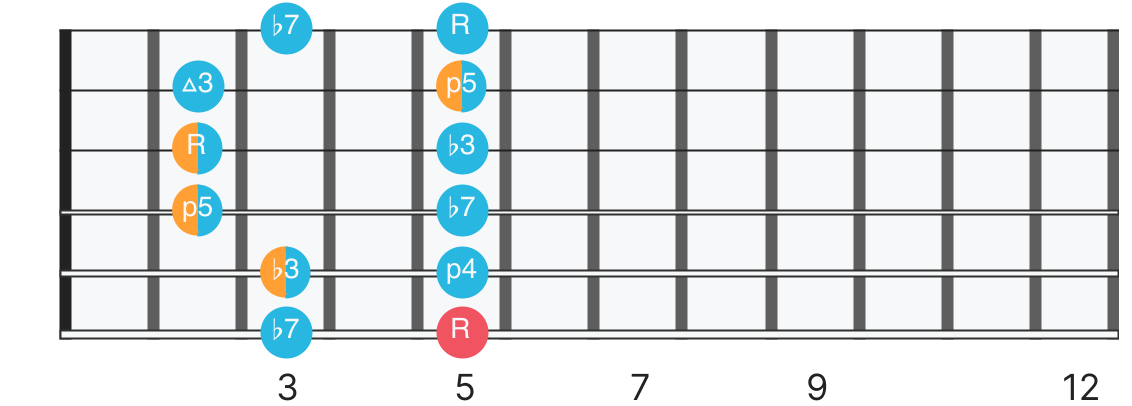
For example if you take the same landmark and build a minor chord moving towards the headstock (the G minor shape), you can build a minor pentatonic scale moving in the same direction.
This produces the Gm shape for the minor pentatonic scale.
Exercise – The Minor Pentatonic Scale
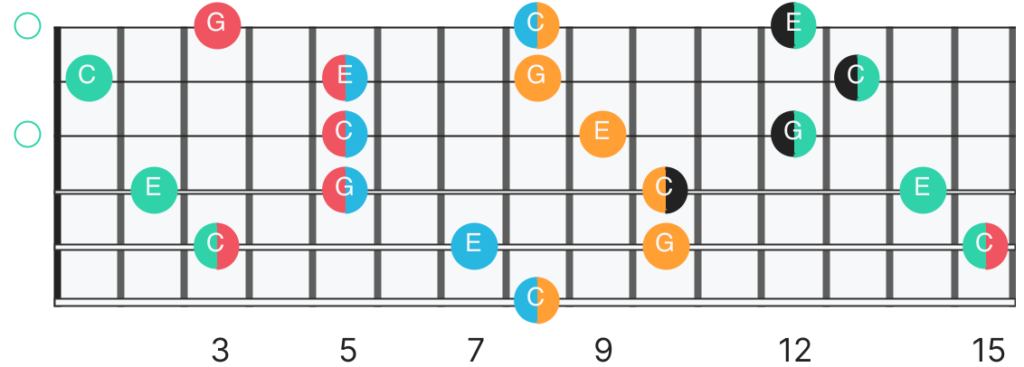
The Major Pentatonic Scale
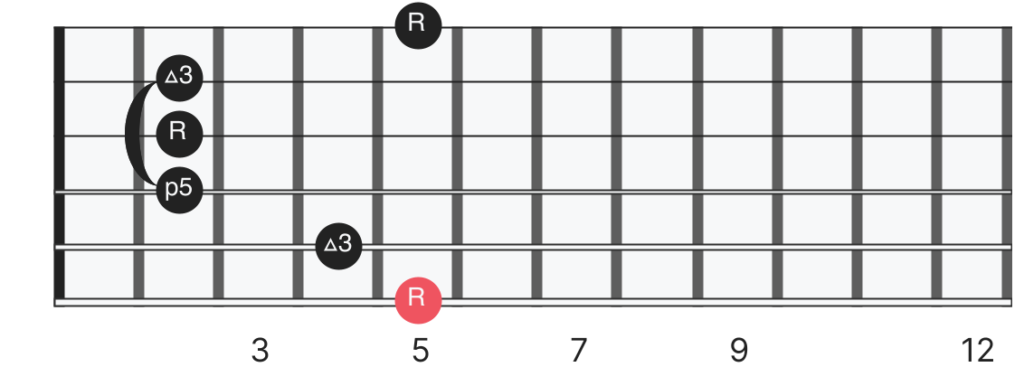
You can do the same trick for the major pentatonic scale shapes. Start from the same landmark on the E string at the 5th fret (A). You can build a major chord moving towards the body. This is the E shape.

You can then build a major pentatonic scale from the same landmark, moving in the same direction. This is the E shape of the major pentatonic scale.
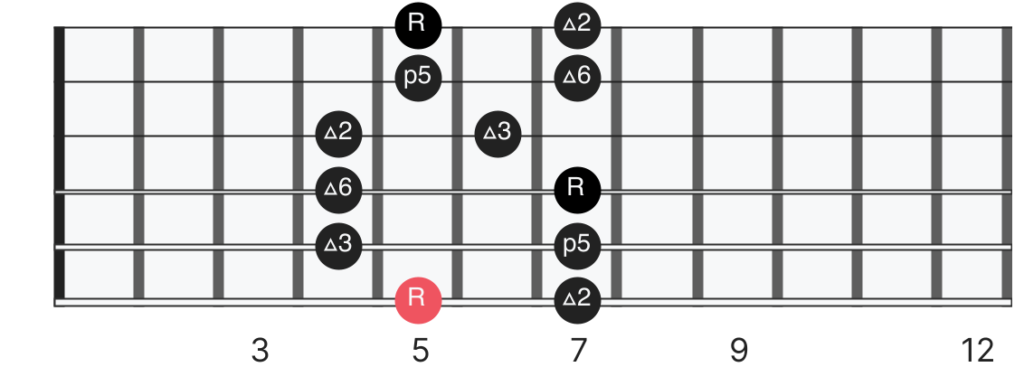
Overlapping the chord shape and the scale shape you can see that scale contains all the notes from the chord.
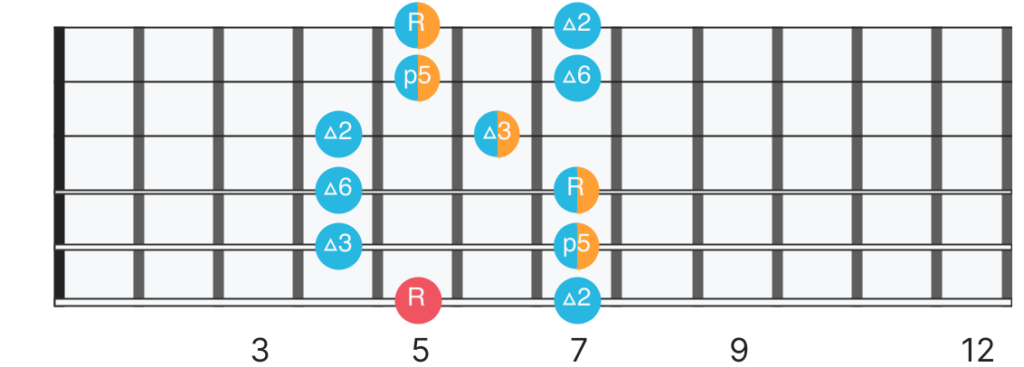
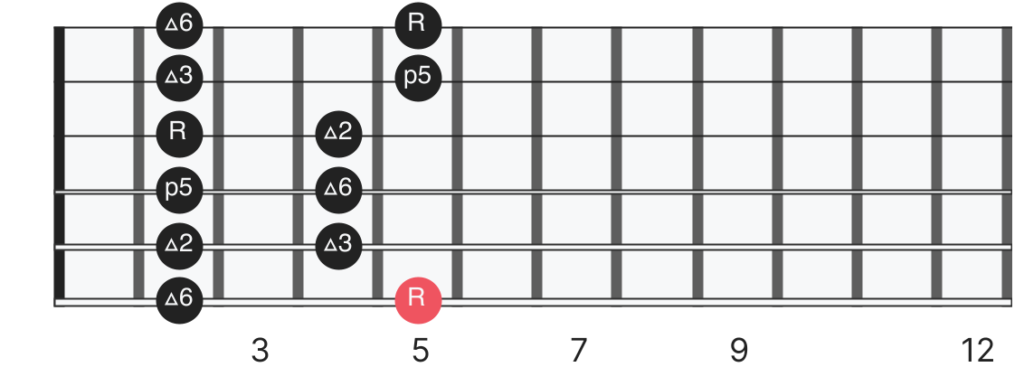
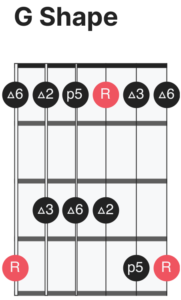
Moving from the same landmark towards the headstock, you can create a major chord using the G shape.
There’s also the major pentatonic scale in it’s G shape moving in the same direction.
Overlapping the chords with the scale you should see that this major pentatonic scale shape contains the same notes as the G shape chord.
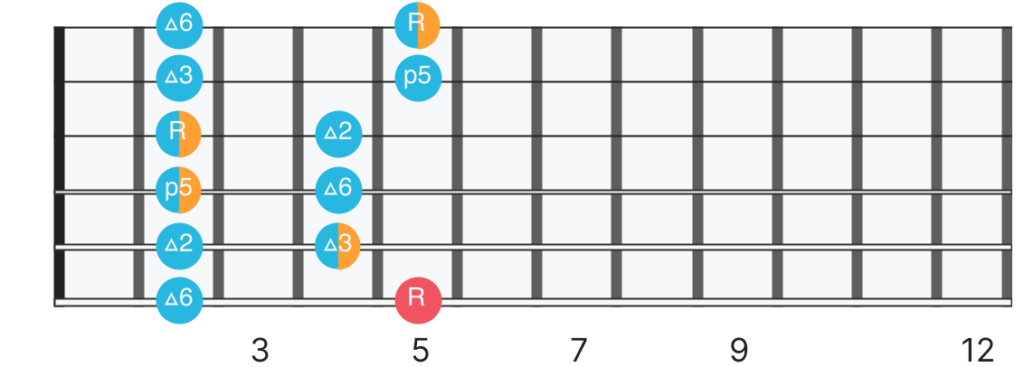
You might also notice that this shape looks exactly the same as the Em shape of the minor pentatonic scale, just shuffled back three frets. Although the scales look the same physically it’s important not to conflate them as the same thing.
Firstly the roots are in different locations. In the Em shape of the minor pentatonic scale the root is under your first finger. In the G shape of the major pentatonic scale the root is under your little finger. When you improvise you are going to want to know where these root notes are in each shape. This will help you make better note choices and help you when navigating the fretboard better. The root notes will act as landmarks against which you can reference your position. If you ignore the root notes you will confuse your shapes and this will make improvisation much more difficult.
Every major pentatonic shape has a minor pentatonic counterpart that uses the same CAGED shape. This is because every major scale has a relative minor scale that contains the same notes. The differences between the shapes lie in where the root note is. I think about it this way. You only need to know five shapes to play both the major and minor pentatonic scales. However you need to know where the root notes are in both the major and minor shapes. Therefore despite the overlap between shapes you should have them memorised as separate entities.
Exercise – Major Pentatonic Scale
Mapping Other Shapes
Whether you want to map a new scale, arpeggio or chord to the fretboard, the CAGED system will help you facilitate it. Here’s the process to use for any chord, scale, or arpeggio you want to learn.
- Pick a key, I like G as it’s give me lots of room to work with.
- Locate your landmark on the E string
- Map the shape from the landmark towards the body
- Spot how the underlying E chord shape overlaps the new shape
- Repeat this from the same landmark moving towards the headstock, notice how the G shape overlaps the new shape
- Repeat this for the landmarks on the A and the D string.
As you do this you can augment your memorisation by associating each shape with the following.
- Where the shape is rooted, be that the E, A or D string. This is the landmark.
- The direction the shape moves in relative to it’s landmark. Body or headstock
- The finger that takes control of the landmark
- The underlying open chord shape that the name is derived from.
Connecting Shapes
Once you can improvise in each shape without much difficulty you can try connecting the shapes together. Start by connecting the shapes that neighbour on the same landmark (eg. Em and Gm). Once you can do this you can try connecting the shapes without common landmarks (Am and Cm, and Em and Dm). Once done you should be able to negotiate changing between shapes as you please.